Introduction
In this tutorial you’ll learn how to create your own Shadowsocks server on an Ubuntu 20.04 platform using Docker.
The server you’ll build will implement the authenticated encryption with associated data (AEAD) cipher chacha20-ietf-poly1305. You’ll test your server with the Shadowsocks for Windows graphical user interface (GUI) client.
At the end of this tutorial, you’ll have a working and tested Shadowsocks server.
Prerequisites
Before you begin this tutorial, you will need a virtual private server (VPS) running Ubuntu 20.04. You can rent servers from companies such as Vultr or Bandwagon Host. You do not need a domain name for the server in this tutorial.
Step 1 — Logging In as Root
SSH into your server. On Linux and macOS, you can use the terminal command ssh to reach your server. On Windows, you can either use PowerShell or a graphical user interface (GUI) such as PuTTY or XSHELL.
If you’re not logged in as root, then become root as follows. If you don’t already know the root password, then set it by issuing the command:
sudo passwd root
The sudo command allows non-root users to issue root commands. The passwd command allows you to set the password for yourself or another user, which in this case is the user named root.
You are prompted to enter your own password:
[sudo] password for amy:
Enter your own (non-root) password.
You are then prompted to enter a new password for the user root:
New password:
Choose and enter the new password for root.
You are prompted to confirm the new password by retyping it:
Retype new password:
Enter the same new password for root.
If all is well, you will receive a feedback message:
passwd: password updated successfully
Now you know the root password, become root:
su -
The su command (short for switch user) allows you to switch to another user id, so that you can run commands with that user’s privileges. Since no specific user is named, you will by default switch to the user root. The hyphen (-) means create a new login environment for the new user, which will be completely separate from your existing login environment.
You are prompted to enter the password for root that you set a few moments ago:
Password:
Enter the root password.
You will notice that your command prompt changes from a dollar sign to a hash sign:
#
This is a reminder that your are logged in as root. Now that you are root, you do not need to prefix privileged commands with sudo.
Update your package lists, and upgrade all your packages to the latest version:
apt update && apt upgrade -y
You will see package upgrade messages in your terminal.
Step 2 — Generating a Random Port Number
Your Shadowsocks server will use a random port for its input. Generate a random number between 1024 and 65535 for your Shadowsocks port number.
shuf -i 1024-65535 -n 1
The shuf command generates random permutations. -i specifies an input range, and -n is the number of lines of output required. We will use the following example in the rest of this tutorial:
25117
Make a note of this number, as you will need it on both the server and the client.
Step 3 — Enabling the Firewall (Optional)
We recommend that you protect your server and especially port 22 (the SSH port) by installing a firewall. In this tutorial, you’ll install and configure the uncomplicated firewall (ufw).
On many Ubuntu systems, ufw is already installed. Check that ufw is installed on your system:
apt list ufw
You should see a message:
ufw/focal,now 0.36-6 all [installed]
If you do not see the message stating that ufw is already installed, then install the software package now:
apt install ufw
Now you’ll set up the firewall. If you can guarantee that you will always SSH into your server from a single IP address, then limit SSH access to just that single address. For example, if your IP address is 51.51.51.51, then issue the command:
ufw allow from 51.51.51.51/32 to any port 22 proto tcp
When you execute that command, you will see a message:
Rules updated
If limiting access to a single IP address is not possible, but you can guarantee you will always connect from a known IP address range, then limit SSH access to just that range. For example, if you are in an office which always uses the IP address range 51.51.51.0/24, then issue the command:
ufw allow from 51.51.51.0/24 to any port 22 proto tcp
If limiting access to an IP address range is not possible, then you will have to open the SSH port for access from the entire world:
ufw allow ssh
In any case, we recommend that you further protect port 22 by using SSH key authentication in preference to password authentication. SSH key pair generation and upload to your server are out of scope for this tutorial. You can find tutorials on this subject on the web.
Open your Shadowsocks port, which in our example is 25117.
ufw allow 25117/tcp
ufw allow 25117/udp
Enable UFW:
ufw enable
You will see a warning message:
Command may disrupt existing ssh connections. Proceed with operation (y|n)?
Type Y and press ENTER to confirm that you wish to enable ufw. You will see a message:
Firewall is active and enabled on system startup
Check the status of your firewall:
ufw status
You will see a firewall status display that looks like the following:
Status: active

To                         Action      From
--                         ------      ----
22/tcp                     ALLOW       51.51.51.0/24
25117/tcp                  ALLOW       Anywhere
25117/udp                  ALLOW       Anywhere
25117/tcp (v6)             ALLOW       Anywhere (v6)
25117/udp (v6)             ALLOW       Anywhere (v6)
If your VPS provider implements the concept of security groups, you will also need to open your security group assignments for these posrts in your provider’s control panel.
Step 4 — Generating a Strong Password
You need to generate a strong password to protect your server. Copy and paste the following command into your terminal session with your server:
< /dev/urandom tr -dc A-Za-z0-9 | head -c 16; echo;
The special file /dev/urandom on Linux systems provides an interface to the kernel’s pseudorandom number generator. The contents of /dev/urandom become input to tr. The tr command is a command-line utility for translating or deleting characters. -d means delete and -c means complement, so -dc means delete any characters that are not in the set A through Z, a through z, and 0 through 9.
The output, now alphanumeric only, is piped into head. The head command is a command-line utility for outputting the first part of a file given to it via standard input. The -c switch limits the number of characters. The operand 16 is the number of characters you want.
Finally, the echo command echoes back input to the terminal, which in this case just gives you a new line after the display of your password.
Here is the sample output. You will see this example used in the rest of this tutorial:
25u4kC4XbIWZJ75Q
Copy your generated password. Open a text editor on your PC . Paste the password into your text editor.
You will need this password on both your server and your client when you run Shadowsocks.
Step 5 — Installing Docker
Now you’ll install Docker on your server.
Install packages to allow apt to use a repository over HTTPS:
apt install -y apt-transport-https ca-certificates curl gnupg lsb-release
Add Docker’s official GPG key:
curl -fsSL https://download.docker.com/linux/ubuntu/gpg | gpg --dearmor -o /usr/share/keyrings/docker-archive-keyring.gpg
Use the following command to set up the Docker stable repository:
echo "deb [arch=amd64 signed-by=/usr/share/keyrings/docker-archive-keyring.gpg] https://download.docker.com/linux/ubuntu $(lsb_release -cs) stable" | tee /etc/apt/sources.list.d/docker.list > /dev/null
The file /etc/apt/sources.list.d/docker.list now contains the Docker repository. Update your package lists accordingly:
apt update
Install Docker:
apt install -y docker-ce docker-ce-cli containerd.io
Verify that Docker Engine is installed correctly by running the hello-world image.
docker run hello-world
You should see messages:
Unable to find image 'hello-world:latest' locally
latest: Pulling from library/hello-world
b8dfde127a29: Pull complete
Digest: sha256:308866a43596e83578c7dfa15e27a73011bdd402185a84c5cd7f32a88b501a24
Status: Downloaded newer image for hello-world:latest

Hello from Docker!
This message shows that your installation appears to be working correctly.

To generate this message, Docker took the following steps:
 1. The Docker client contacted the Docker daemon.
 2. The Docker daemon pulled the "hello-world" image from the Docker Hub.
    (amd64)
 3. The Docker daemon created a new container from that image which runs the
    executable that produces the output you are currently reading.
 4. The Docker daemon streamed that output to the Docker client, which sent it
    to your terminal.

To try something more ambitious, you can run an Ubuntu container with:
 $ docker run -it ubuntu bash

Share images, automate workflows, and more with a free Docker ID:
 https://hub.docker.com/

For more examples and ideas, visit:
 https://docs.docker.com/get-started/
Step 6 — Pulling the Image
Pull Teddysun’s Docker image for Shadowsocks-Rust by issuing the command:
docker pull teddysun/shadowsocks-rust
You will see messages that look like the following:
Using default tag: latest
latest: Pulling from teddysun/shadowsocks-rust
45b42c59be33: Pull complete
f50629ee3cc4: Pull complete
b270b750cfe4: Pull complete
3854afaafaf8: Pull complete
0cc26c8d335f: Pull complete
c02c65108591: Pull complete
Digest: sha256:4d79f0f64c397e5beb82661367449eeb3ab27022fd0c10581f13f55056973ea4
Status: Downloaded newer image for teddysun/shadowsocks-rust:latest
docker.io/teddysun/shadowsocks-rust:latest
Step 7 — Configuring Shadowsocks
Now you’ll create your Shadowsocks configuration file on the server.
Make a directory in /etc named /shadowsocks-rust:
mkdir /etc/shadowsocks-rust
Create a configuration file /etc/shadowsocks-rust/config.json using the example below as a template. Before you use the example:
- Replace
25117by your choice of random port number - Replace
25u4kC4XbIWZJ75Qby your choice of strong password - Replace
chacha20-ietf-poly1305by your choice of cipher, but make sure you use an AEAD cipher
cat > /etc/shadowsocks-rust/config.json <<EOF
{
    "server":"0.0.0.0",
    "server_port":25117,
    "password":"25u4kC4XbIWZJ75Q",
    "timeout":300,
    "method":"chacha20-ietf-poly1305",
    "nameserver":"8.8.8.8",
    "mode":"tcp_and_udp"
}
EOF
Step 8 — Running the Container
Run the command that follows, replacing 25117 in all four places by your choice of port number:
docker run -d -p 25117:25117 -p 25117:25117/udp --name ss-rust --restart=always -v /etc/shadowsocks-rust:/etc/shadowsocks-rust teddysun/shadowsocks-rust
The -d option means run detached. The -p option specifies exposed ports. The -v option gives the volumes.
Step 9 — Testing with Windows Client
Now work on your PC.
Download the most recent release of the Windows client from https://github.com/shadowsocks/shadowsocks-windows/releases.
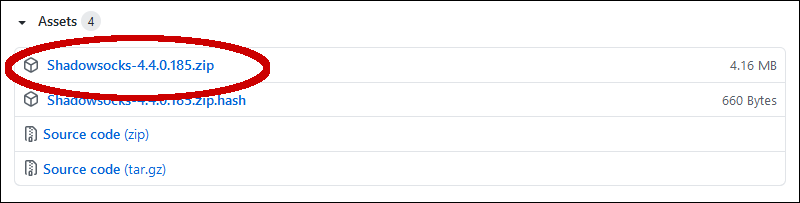
Unzip the zip file.

Double-click on the application shadowsocks.exe to launch the Shadowsocks for Windows client. If Microsoft Defender SmartScreen appears, click More info then Run anyway.
Enter client parameters that match the configuration you specified on your server:
- Enter your actual Server IP address
- Enter your choice of Shadowsocks Server Port number, which is
25117in our example - Enter your choice of Password, which is
25u4kC4XbIWZJ75Qin our example - Select your choice of Encryption cipher, which is
chacha20-ietf-poly1305in our example
Click Apply.
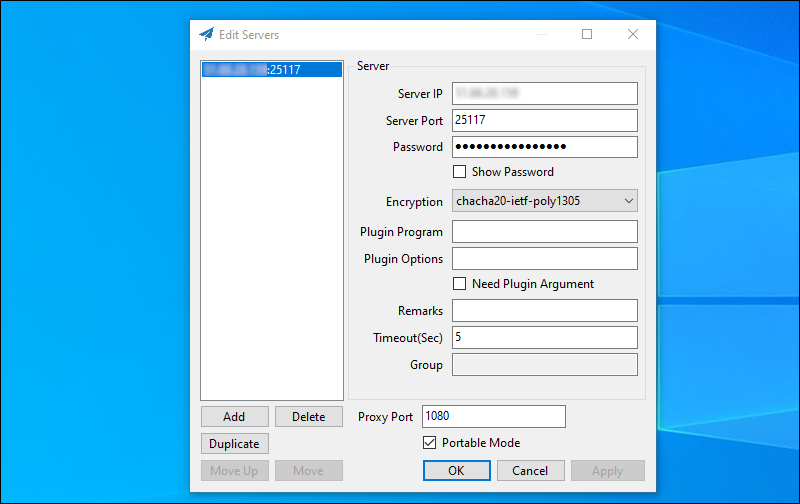
Click OK. A notification appears to say that Shadowsocks is connected.

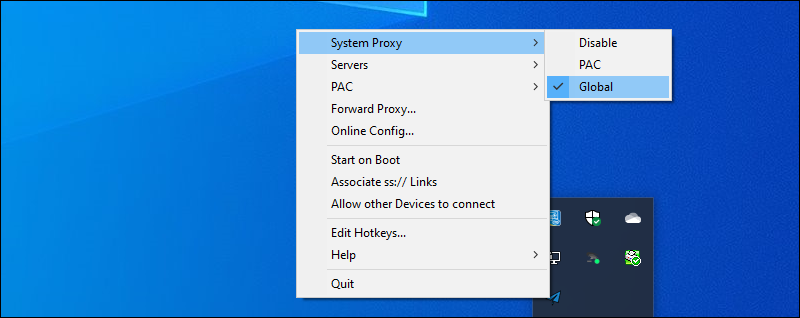
Right-click on the Shadowsocks paper airplane icon in the system tray. This brings up the context menu. Select System Proxy. Make sure you are in Global mode.
In your browser, visit https://www.iplocation.net to confirm that your web browsing is now coming from your server location.
When you have finished browsing, Quit Shadowsocks from the context menu.
Conclusion
You now have a working Shadowsocks server that you’ve tested with the Windows client.
You can find out more about the different versions of Shadowsocks at https://github.com/shadowsocks.
See also
- How to Create a VLESS WebSocket TLS CDN Server on Ubuntu 20.04
- How to Create a Brook Server and Client on Ubuntu 20.04
- How to Install Tor Browser or Standalone Tor on Ubuntu 20.04
- How to Build a Camouflaged Telegram MTProto Proxy Server on Ubuntu 20.04
- How to Build a V2Ray Tor On-Ramp on Ubuntu 20.04