Introduction
Tor Browser allows users in the non-free world to access the Internet. The standalone Tor program allows volunteers to support this access with relays, bridges, and onion services.
In this post you’ll learn four methods for installing Tor on Ubuntu 20.04:
- installing Tor Browser
- installing standalone Tor from the Ubuntu repositories
- installing standalone Tor from the Tor Project repositories
- installing standalone Tor by compiling from source
You do not need to implement all four of these methods. You can simply choose the one that corresponds to your needs.
At the end of the tutorial, you’ll have Tor Browser or standalone Tor installed on your Ubuntu Linux computer.
Prerequisites
There are no special requirements for Tor Browser other than an up-to-date Ubuntu Linux desktop.
For standalone Tor, you will need to open your computer’s firewall:
- for relays or onion services, open the
ORPortdefined in yourtorrcfile - for bridges, open the
ORPortdefined in yourtorrcfile, unless you want to keep your bridge hidden and you setAssumeReachablein yourtorrc - for bridges, open the
ServerTransportListenAddrport - if you want your server to mirror the directory, open the
DirPortdefined in yourtorrcfile
Method 1 — Installing Tor Browser
How you get the Tor Browser installer depends on where you are:
- If you are in the free world, download Tor Browser for 64-bit or 32-bit Linux from https://www.torproject.org/download/languages. The page offers installers for 16 languages.
- If you are not in the free world, send an email to gettor@torproject.org specifying your operating system and your locale in the body of the message. For example, you would put
windows esfor a Windows computer in the Spanish language.
The downloaded file will by default be in your Ubuntu Downloads directory. Open a terminal, and change into that directory:
cd ~/Downloads
Determine the name of your downloaded file:
ls -l
The -l switch gives a long-format listing with details of each file on a separate line. We will use the example name of tor-browser-linux64-10.0.10_en-US.tar.xz.
Extract the files and directories from your compressed tar archive:
tar -xf tor-browser-linux64-10.0.10_en-US.tar.xz
It will take a few seconds to extract, as the archive is quite large (more than 80 MB).
Determine the name of the extracted directory:
ls -l
We will use the example of tor-browser_en-US.
Change into the extracted directory. For example:
cd tor-browser_en-US
Run the script to register the application:
./start-tor-browser.desktop --register-app
You will see messages:
Launching './Browser/start-tor-browser --detach --register-app'...
Tor Browser has been registered as a desktop app for this user in ~/.local/share/applications/
Close the terminal.
Press the apps button at the bottom left of your GNOME desktop to show your applications. Search for tor. You will see the Tor Browser application.

Double-click on the icon to launch Tor Browser.
Right-click on the icon in the favorites bar on the left of the GNOME desktop.

Select Add to Favorites to permanently add the Tor Browser to your favorites bar.
Now select the option that corresponds to your situation:
- Click Connect to connect to Tor directly.
- Click Configure to adjust network settings if you are in a country that censors Tor or if you are connecting from a private network that requires a proxy server.
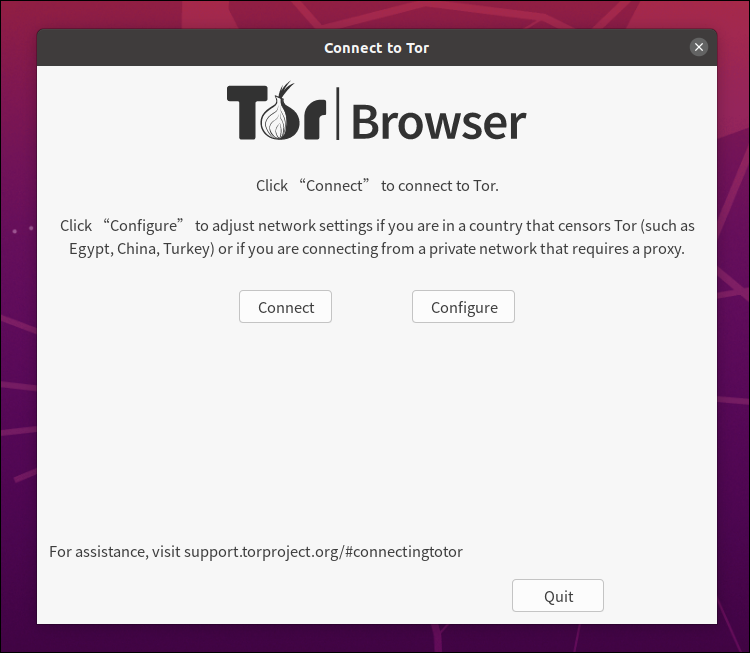
It can take a few minutes to make the connection to the Tor network. You will then see the initial screen.

Links on the initial page show you where you can get more information on operating Tor Browser.
Method 2 — Installing Standalone Tor from the Ubuntu Repositories
SSH into your server. Get your server software up to date:
sudo apt update && sudo apt -y upgrade
Install standalone Tor from the Ubuntu repositories:
sudo apt -y install tor
This installs Tor version 0.4.2.7. The service tor@default is running, and listening on port 9050. The default torrc file is located at /etc/tor/torrc.
Method 3 — Installing Standalone Tor from the Tor Project Repositories
SSH into your server. Get your server software up to date:
sudo apt update && sudo apt -y upgrade
Add the apt-transport-https package to allow fetching packages over HTTPS:
sudo apt -y install apt-transport-https
Edit your APT sources list, /etc/apt/sources.list:
sudo nano /etc/apt/sources.list
At the bottom of the file, dd the Tor Project repositories:
deb https://deb.torproject.org/torproject.org focal main
deb-src https://deb.torproject.org/torproject.org focal main
Write the file out to disk, and exit the editor.
Download and import the Tor Project signing key:
curl https://deb.torproject.org/torproject.org/A3C4F0F979CAA22CDBA8F512EE8CBC9E886DDD89.asc | sudo gpg --import
It is normal to see a message no ultimately trusted keys found:
gpg: key EE8CBC9E886DDD89: 83 signatures not checked due to missing keys
gpg: /root/.gnupg/trustdb.gpg: trustdb created
gpg: key EE8CBC9E886DDD89: public key "deb.torproject.org archive signing key" imported
gpg: Total number processed: 1
gpg:               imported: 1
gpg: no ultimately trusted keys found
Add the Tor Project GPG key to your APT sources keyring:
sudo gpg --export A3C4F0F979CAA22CDBA8F512EE8CBC9E886DDD89 | sudo apt-key add -
You should see a response:
OK
Update your package lists and install Tor:
sudo apt update
sudo apt -y install tor deb.torproject.org-keyring
At the time of writing, this installs Tor version 0.4.5.6. The service tor@default is running, and listening on port 9050. The default torrc file is located at /etc/tor/torrc.
Method 4 — Installing Standalone Tor by Compiling from Source
Compiling Tor from source will give you an up-to-date binary, but you will have to do more work than you would with a package.
Start by SSH-ing into your server. Get your server software up to date:
sudo apt update && sudo apt -y upgrade
Open a browser and visit https://www.torproject.org/download/tor.
From that page, determine the latest release of Tor. We will use the example 0.4.5.6.
Back in your SSH session with your server, download the source for that version. For example:
wget https://dist.torproject.org/tor-0.4.5.6.tar.gz
Extract the files and directories from the archive:
tar -xzf tor-0.4.5.6.tar.gz
Change into the extracted directory:
cd tor-0.4.5.6
Install the prerequisites for the compile:
sudo apt -y install build-essential libevent-dev libssl-dev zlib1g-dev
Then configure:
./configure
Various precompile checks are carried out, ending with messages:
Tor Version: Tor 0.4.5.6

Build Features
  Compiler:                                                      gcc
  Host OS:                                                       linux-gnu

  Warnings are fatal (--enable-fatal-warnings):                  no
  Rust support (--enable-rust):                                  no
  Cargo Online Fetch (--enable-cargo-online-mode):               no
  Android support (--enable-android):                            no

Static Build
  tor (--enable-static-tor):                                     no
  libevent (--enable-static-libevent):                           no
  libssl (--enable-static-openssl):                              no
  zlib1g (--enable-static-zlib):                                 no

Optional Libraries
  libnss (--enable-nss):                                         no
  libseccomp (--disable-seccomp):                                yes
  libscrypt (--disable-libscrypt):                               yes
  Systemd support (--enable-systemd):                            no
  liblzma (--enable-lzma):                                       no
  libzstd (--enable-zstd):                                       no

Hardening
  Compiler Hardening (--disable-gcc-hardening):                  yes
  Linker Hardening (--disable-linker-hardening):                 yes
  Fragile Hardening (--enable-fragile-hardening, dev only):      no

Modules
  relay (--disable-module-relay):                                yes
  dirauth (--disable-module-dirauth):                            yes
  dircache:                                                      yes

Documentation
  AsciiDoc (--disable-asciidoc):                                 yes
  Man Pages (--disable-manpage):                                 yes
  HTML Manual (--disable-html-manual):                           yes

Tests
  Unit tests (--disable-unittests):                              yes
  assert()s enabled (--enable-asserts-in-tests, dev only):       no
  Code Coverage (--enable-coverage):                             no
  libFuzzer support (--enable-libfuzzer):                        no
  OSS-Fuzz support (--enable-oss-fuzz):                          no

Tracing (--enable-tracing-instrumentation-<type>)
  Tracepoints to log_debug() (log-debug):                        no
  USDT Instrumentation (usdt):                                   no
  LTTng Instrumentation (lttng):                                 no

Install Directories
  Binaries:                                                      /usr/local/bin
  Configuration:                                                 /usr/local/etc/                                                                                             tor
  Man Pages:                                                     /usr/local/shar                                                                                             e/man

Configure Line: ./configure

  WARNING:
Encountered 2 warning(s). See messages above for more info.
Compile Tor from source:
make
The compile takes many minutes.
Once the compile has completed, install Tor into /usr/local/:
sudo make install
The Tor binary is in /usr/local/bin/. The GeoIP and GeoIP6 databases are in /usr/local/share/tor. The sample torrc.sample is in /usr/local/etc/tor.
Note that, in contrast to installing Tor from a package in the repositories, there is no Tor service running, and there are no Tor systemd service files. You can run tor from the command line, or you can create the systemd service files yourself.
For Tor command-line and configuration-file options, consult the Tor manual pages.
If you want to build systemd service files, you can use as your model the multi-instance master /usr/lib/systemd/system/tor.service included with Ubuntu 20.04:
# This service is actually a systemd target,
# but we are using a service since targets cannot be reloaded.

[Unit]
Description=Anonymizing overlay network for TCP (multi-instance-master)

[Service]
Type=oneshot
RemainAfterExit=yes
ExecStart=/bin/true
ExecReload=/bin/true

[Install]
WantedBy=multi-user.target
And the /usr/lib/systemd/system/tor@.service instantiable service unit included with Ubuntu 20.04:
[Unit]
Description=Anonymizing overlay network for TCP (instance %i)
After=network.target nss-lookup.target
PartOf=tor.service
ReloadPropagatedFrom=tor.service

[Service]
Type=notify
NotifyAccess=all
PIDFile=/run/tor-instances/%i/tor.pid
PermissionsStartOnly=yes
ExecStartPre=/usr/bin/install -Z -m 02755 -o _tor-%i -g _tor-%i -d /run/tor-instances/%i
ExecStartPre=/bin/sed -e 's/@@NAME@@/%i/g; w /run/tor-instances/%i.defaults' /usr/share/tor/tor-service-defaults-torrc-instances
ExecStartPre=/usr/bin/tor --defaults-torrc /run/tor-instances/%i.defaults -f /etc/tor/instances/%i/torrc --verify-config
ExecStart=/usr/bin/tor --defaults-torrc /run/tor-instances/%i.defaults -f /etc/tor/instances/%i/torrc
ExecReload=/bin/kill -HUP ${MAINPID}
KillSignal=SIGINT
TimeoutStartSec=300
TimeoutStopSec=60
Restart=on-failure
LimitNOFILE=65536

# Hardening
NoNewPrivileges=yes
PrivateTmp=yes
PrivateDevices=yes
ProtectHome=yes
ProtectSystem=full
ReadOnlyDirectories=/
# We would really like to restrict the next item to [..]/%i but we can't,
# as systemd does not support that yet.  See also #781730.
ReadWriteDirectories=-/var/lib/tor-instances
ReadWriteDirectories=-/run
CapabilityBoundingSet=CAP_SETUID CAP_SETGID CAP_NET_BIND_SERVICE CAP_DAC_READ_SEARCH

[Install]
WantedBy=multi-user.target
And the /usr/lib/systemd/system/tor@default.service instance included with Ubuntu 20.04:
[Unit]
Description=Anonymizing overlay network for TCP
After=network.target nss-lookup.target
PartOf=tor.service
ReloadPropagatedFrom=tor.service

[Service]
Type=notify
NotifyAccess=all
PIDFile=/run/tor/tor.pid
PermissionsStartOnly=yes
ExecStartPre=/usr/bin/install -Z -m 02755 -o debian-tor -g debian-tor -d /run/tor
ExecStartPre=/usr/bin/tor --defaults-torrc /usr/share/tor/tor-service-defaults-torrc -f /etc/tor/torrc --RunAsDaemon 0 --verify-config
ExecStart=/usr/bin/tor --defaults-torrc /usr/share/tor/tor-service-defaults-torrc -f /etc/tor/torrc --RunAsDaemon 0
ExecReload=/bin/kill -HUP ${MAINPID}
KillSignal=SIGINT
TimeoutStartSec=300
TimeoutStopSec=60
Restart=on-failure
LimitNOFILE=65536

# Hardening
AppArmorProfile=-system_tor
NoNewPrivileges=yes
PrivateTmp=yes
PrivateDevices=yes
ProtectHome=yes
ProtectSystem=full
ReadOnlyDirectories=/
ReadWriteDirectories=-/proc
ReadWriteDirectories=-/var/lib/tor
ReadWriteDirectories=-/var/log/tor
ReadWriteDirectories=-/run
CapabilityBoundingSet=CAP_SETUID CAP_SETGID CAP_NET_BIND_SERVICE CAP_DAC_READ_SEARCH
Conclusion
You now have Tor Browser or standalone Tor installed on your Ubuntu Linux computer.
You can read the Tor documentation, including configuration instructions, on the Tor Project website.