Introduction
Telegram Messenger supports two kinds of proxies: a standard SOCKS5 proxy server and an MTProto proxy server.
In this post you’ll learn how to build a camouflaged MTProto proxy server. This style of proxy can help you bypass censorship in certain countries.
By following along, you’ll see how to create an Nginx camouflage web server and a hidden MTProto proxy server that implements the fake TLS protocol on the same host as the web server. Casual visitors to the server will see only a website.
At the end of this tutorial, you’ll have a working and tested MTProto proxy server and a secret you can share with your friends.
Prerequisites
Before you begin this tutorial, you will need:
- A virtual private server (VPS) running Ubuntu 20.04. You can rent servers from providers such as Google Cloud or Vultr. This server needs to be located in a country that does not block Telegram Messenger.
- Your own domain name, which may be free or paid.
- A DNS type
Arecord pointing from the fully qualified domain name of your server to the server’s IP address. Usually you set up the DNS record at your domain name registrar.
Step 1 — Logging In as Root
SSH into your server. On Linux and macOS, you can use the terminal command ssh to reach your server. On Windows, you can either use PowerShell or a graphical user interface (GUI) such as PuTTY or XSHELL.
If you’re not logged in as root, then become root as follows. If you don’t already know the root password, then set it by issuing the command:
sudo passwd root
The sudo command allows non-root users to issue root commands. The passwd command allows you to set the password for yourself or another user, which in this case is the user named root.
You are prompted to enter your own password:
[sudo] password for amy:
Enter your own (non-root) password.
You are then prompted to enter a new password for the user root:
New password:
Choose and enter the new password for root.
You are prompted to confirm the new password by retyping it:
Retype new password:
Enter the same new password for root.
If all is well, you will receive a feedback message:
passwd: password updated successfully
Now you know the root password, become root:
su -
The su command (short for switch user) allows you to switch to another user id, so that you can run commands with that user’s privileges. Since no specific user is named, you will by default switch to the user root. The hyphen (-) means create a new login environment for the new user, which will be completely separate from your existing login environment.
You are prompted to enter the password for root that you set a few moments ago:
Password:
Enter the root password.
You will notice that your command prompt changes from a dollar sign to a hash sign:
#
This is a reminder that your are logged in as root. Now that you are root, you do not need to prefix privileged commands with sudo.
Update your package lists, and upgrade all your packages to the latest version:
apt update && apt upgrade -y
You will see package upgrade messages in your terminal.
Step 2 — Enabling the Firewall (Optional)
We recommend that you protect your server and especially port 22 (the SSH port) by installing a firewall. In this tutorial, you’ll install and configure the uncomplicated firewall (ufw).
On many Ubuntu systems, ufw is already installed. Check that ufw is installed on your system:
apt list ufw
You should see a message:
ufw/focal,now 0.36-6 all [installed]
If you do not see the message stating that ufw is already installed, then install the software package now:
apt install ufw
Now you’ll set up the firewall. If you can guarantee that you will always SSH into your server from a single IP address, then limit SSH access to just that single address. For example, if your IP address is 12.12.12.12, then issue the command:
ufw allow from 12.12.12.12/32 to any port 22 proto tcp
When you execute that command, you will see a message:
Rule added
If limiting access to a single IP address is not possible, but you can guarantee you will always connect from a known IP address range, then limit SSH access to just that range. For example, if you are in an office which always uses the IP address range 12.12.12.0/24, then issue the command:
ufw allow from 12.12.12.0/24 to any port 22 proto tcp
If limiting access to an IP address range is not possible, then you will have to open the SSH port for access from the entire world:
ufw allow ssh
In any case, we recommend that you further protect port 22 by using SSH key authentication in preference to password authentication. SSH key pair generation and upload to your server are out of scope for this tutorial. You can find tutorials on this subject on the web.
Open ports 80 (the HTTP port) and 443 (the HTTPS port). These will be used for the Nginx camouflage web server:
ufw allow http

ufw allow https
Also open port 993 for cloaking:
ufw allow to any port 993 proto tcp
Enable UFW:
ufw enable
You will see a warning message:
Command may disrupt existing ssh connections. Proceed with operation (y|n)?
Type Y and press ENTER to confirm that you wish to enable ufw. You will see a message:
Firewall is active and enabled on system startup
Check the status of your firewall:
ufw status
You will see a firewall status display that looks like the following:
Status: active

To                         Action      From
--                         ------      ----
22/tcp                     ALLOW       12.12.12.0/24
80/tcp                     ALLOW       Anywhere
443/tcp                    ALLOW       Anywhere
993/tcp                    ALLOW       Anywhere
80/tcp (v6)                ALLOW       Anywhere (v6)
443/tcp (v6)               ALLOW       Anywhere (v6)
If your VPS provider implements the concept of security groups, you will also need to open your security group assignments for ports 22, 80, 443, and 993 in their control panel.
Step 3 — Creating a Camouflage Website
Now you’ll install Nginx and obtain an SSL certificate. The purpose of Nginx is to camouflage your MTProto proxy server.
Install the Nginx web server package:
apt install nginx -y
If Nginx was not already installed, you will see the package installation messages.
Edit the default virtual host configuration file, /etc/nginx/sites-available/default:
nano /etc/nginx/sites-available/default
Find the line containing server_name _;. Change it so that it refers to the fully qualified domain name of your server:
server_name your_domain;
Write the file out to disk, and exit the editor.
Restart Nginx with your revised configuration:
systemctl restart nginx
You will use snap to install certbot, the Let’s Encrypt client. First install the core snap:
snap install core
After the snap is installed, you will see a confirmation message:
core 16-2.48.2.1 from Canonical✓ installed
Get the core snap up to date if necessary:
snap refresh core
Since core is already up to date, you should see a message:
snap "core" has no updates available
Now use snap to install the certbot client for Let’s Encrypt:
snap install --classic certbot
The --classic option means that certbot will not be confined to a restricted environment in the same way as normal snaps are.
The installation ends with a message:
certbot 1.12.0 from Certbot Project (certbot-eff✓) installed
The snap executable for certbot is in the directory /snap/bin, which should be in your execution PATH. If you want to make extra sure that certbot is executable, then also create a symbolic link to certbot in your /usr/bin directory, which should definitely be in your PATH:
ln -s /snap/bin/certbot /usr/bin/certbot
The symbolic link /usr/bin/certbot now points to the actual executable at /snap/bin/certbot.
Now you can invoke certbot to obtain your SSL certificate from the Let’s Encrypt project:
certbot --nginx
The --nginx option tells certbot that Nginx is already running and available for use by certbot to validate your request.
You are asked to enter your email address in case Let’s Encrypt has some urgent notices to send you:
Enter email address (used for urgent renewal and security notices)
 (Enter 'c' to cancel):
Type your email address, and press ENTER.
You are asked to read and agree to the terms of service:
- - - - - - - - - - - - - - - - - - - - - - - - - - - - - - - - - - - - - - - -
Please read the Terms of Service at
https://letsencrypt.org/documents/LE-SA-v1.2-November-15-2017.pdf. You must
agree in order to register with the ACME server. Do you agree?
- - - - - - - - - - - - - - - - - - - - - - - - - - - - - - - - - - - - - - - -
(Y)es/(N)o:
Type Y and press ENTER.
You are asked if you want to share your email address with the Electronic Frontier Foundation:
- - - - - - - - - - - - - - - - - - - - - - - - - - - - - - - - - - - - - - - -
Would you be willing, once your first certificate is successfully issued, to
share your email address with the Electronic Frontier Foundation, a founding
partner of the Let's Encrypt project and the non-profit organization that
develops Certbot? We'd like to send you email about our work encrypting the web,
EFF news, campaigns, and ways to support digital freedom.
- - - - - - - - - - - - - - - - - - - - - - - - - - - - - - - - - - - - - - - -
(Y)es/(N)o:
Type Y or N as you prefer, and press ENTER.
You are asked to confirm which fully qualified domain name(s) you want an SSL certificate for:
Which names would you like to activate HTTPS for?
- - - - - - - - - - - - - - - - - - - - - - - - - - - - - - - - - - - - - - - -
1: your_domain
- - - - - - - - - - - - - - - - - - - - - - - - - - - - - - - - - - - - - - - -
Select the appropriate numbers separated by commas and/or spaces, or leave input
blank to select all options shown (Enter 'c' to cancel):
Type the number of your server’s fully qualified domain name, which would be 1 in our example, and press ENTER.
The utility performs “challenges” to confirm that your domain name choice is legitimate. If all is well, you should see some closing messages. Certbot amends your site definition to supplement the existing HTTP server with an HTTPS server:
Redirecting all traffic on port 80 to ssl in /etc/nginx/sites-enabled/default

- - - - - - - - - - - - - - - - - - - - - - - - - - - - - - - - - - - - - - - -
Congratulations! You have successfully enabled https://your_domain
- - - - - - - - - - - - - - - - - - - - - - - - - - - - - - - - - - - - - - - -
You will then see some notes on the certificate and key locations:
 - Congratulations! Your certificate and chain have been saved at:
   /etc/letsencrypt/live/your_domain/fullchain.pem
   Your key file has been saved at:
   /etc/letsencrypt/live/your_domain/privkey.pem
   Your certificate will expire on 2021-05-18. To obtain a new or
   tweaked version of this certificate in the future, simply run
   certbot again. To non-interactively renew *all* of your
   certificates, run "certbot renew"
 - If you like Certbot, please consider supporting our work by:

   Donating to ISRG / Let's Encrypt:   https://letsencrypt.org/donate
   Donating to EFF:                    https://eff.org/donate-le
Finally, do a dry run to check that the renewal process will work in 90 days' time:
certbot renew --dry-run
This should end with a message:
- - - - - - - - - - - - - - - - - - - - - - - - - - - - - - - - - - - - - - - -
Congratulations, all simulated renewals succeeded:
  /etc/letsencrypt/live/your_domain/fullchain.pem (success)
- - - - - - - - - - - - - - - - - - - - - - - - - - - - - - - - - - - - - - - -
Test your web server. In a browser, visit your fully qualified domain name (https://your_domain). You should see the Welcome to nginx! page.
Optionally, you can now add some content (HTML, CSS, etc.) to your camouflage website at /var/www/html to increase its realism.
Step 4 — Installing Go Language
Go is a statically typed, compiled programming language designed at Google by Ken Thompson, Robert Griesemer, and Rob Pike. Ken Thompson designed and implemented the original Unix operating system.
In this step, you’ll install the Go compiler on your server. You can determine the latest version from https://golang.org.
Start by downloading the latest version of Go. From the Go language website linked above, this is currently version 1.16. It may be higher when you read this tutorial.
wget https://golang.org/dl/go1.16.linux-amd64.tar.gz
Extract the contents of the tarball into /usr/local:
tar -C /usr/local -xzf go1.16.linux-amd64.tar.gz
Include the Go binary in your current execution path:
export PATH=$PATH:/usr/local/go/bin
This will be effective for the duration of your current SSH session. If you need to have Go in your execution path permanently, then add it to /etc/profile.
Step 5 — Downloading Mtg
Mtg is an MTProto implementation in the Go language that is intended to be lightweight, consuming as few resources as possible.
Before downloading Mtg, you will need to install git if it is not already on your system:
apt install git -y
Then use git to clone the Mtg source code from GitHub:
git clone https://github.com/9seconds/mtg.git
This creates a directory mtg with the Mtg source code in it.
Step 6 — Building Mtg
Now you will use the Go language compiler to build Mtg. Change into the directory containing the Mtg source:
cd mtg
Build the binary from source:
go build
You will see the dependencies being downloaded. The mtg executable is created within your current mtg directory.
Copy the mtg binary into your execution path:
cp mtg /usr/local/bin
Step 7 — Generating Secret
MTProto proxy servers require the user to know a “secret” to access them. Generate a secret with the command below. Replace host.example.com by your server’s actual hostname (i.e., the fully qualified domain name, for which you create a DNS A record as one of the prerequisites).
mtg generate-secret -c host.example.com tls
This returns a secret, which will begin with the prefix ee, indicating a fake TLS secret:
ee0123456789abcdef...
Save the secret in a text editor on your PC, as you will need it later.
Step 8 — Reconfiguring Nginx
You want Mtg to listen on port 443. Therefore you will now edit the Nginx default host configuration file, /etc/nginx/sites-available/default, so that Nginx listens on port 993 instead of 443.
nano /etc/nginx/sites-available/default
Amend the listening port in the ssl server block. Change the Nginx port from 443 to 993 for both IPv4 and IPv6:
        listen [::]:993 ssl ipv6only=on; # managed by Certbot
        listen 993 ssl; # managed by Certbot
Write the file out to disk, and exit the editor.
Restart Nginx with this new configuration:
systemctl restart nginx
Step 9 — Configuring Mtg
Create a systemd service file for Mtg named /usr/lib/systemd/system/mtg.service:
nano /usr/lib/systemd/system/mtg.service
Insert the template below, but substitute your actual secret instead of the placeholder <SECRET>. The angle brackets are just to indicate a substitutable variable and are not included in the final file. For<SERVER.IP> put the public IPv4 address of your server. Other possible parameters are documented in the https://github.com/9seconds/mtg/blob/master/README.md.
[Unit]
Description=Telegram MTProto Proxy Server
Documentation=https://github.com/9seconds/mtg
Wants=network-online.target
After=network-online.target

[Service]
Restart=always
User=root
Group=root
ExecStart=/usr/local/bin/mtg run --cloak-port 993 -4 <SERVER.IP>:443 -b 0.0.0.0:443 <SECRET>

[Install]
WantedBy=multi-user.target
When you’ve put in yout actual values, write the file out to disk, and exit the editor.
Step 10 — Starting and Checking Mtg
Run the Mtg service, mtg, after every reboot:
systemctl enable mtg
Start the Mtg service now:
systemctl start mtg
Check that mtg is active and running:
systemctl status mtg
You should see a result such as:
mtg.service - Telegram MTProto Proxy Server
     Loaded: loaded (/lib/systemd/system/mtg.service; enabled; vendor preset: enabled)
     Active: active (running) since Thu 2021-02-18 12:18:05 UTC; 39s ago
       Docs: https://github.com/9seconds/mtg
   Main PID: 34363 (mtg)
      Tasks: 8 (limit: 1137)
     Memory: 6.9M
     CGroup: /system.slice/mtg.service
             └─34363 /usr/local/bin/mtg run --cloak-port 993 -4 <SERVER.IP>:443 -b 0.0.0.0:443 <SECRET>
If you want to review any messages for the systemd unit mtg, then issue the command:
journalctl -u mtg
Step 11 — Testing
Now work on your client device. We will use the example of an Android phone.
Before you go any further, test your camouflage web server. In an ordinary browser, visit your fully qualified domain name (https://your_domain). You should see the Welcome to nginx! page (or the realistic content, if you added some).
Now you know your camouflage web server is working, you can carry on.
We will illustrate the example of MTProxy on Android. Go to Settings. Tap Data and Storage. Scroll down and tap Proxy Settings.
Toggle Use Proxy to the ON position. Select the radio button for MTProto Proxy.
Enter the proxy details for your MTProto proxy. The information you need is:
- Server (
your_domain) - Port (put
443) - Secret (put the secret as generated, which begins with
eefor a fake TLS proxy)
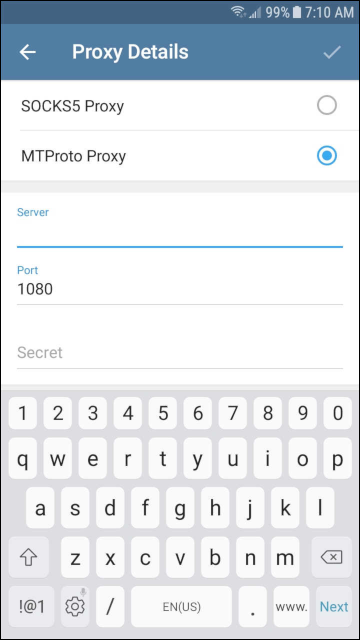
Press the check mark to save your settings.
Go back to the Proxy Settings screen. It will take a few seconds to connect to the proxy.
Test your connection with your friends and/or a group.
Step 12 — Sharing the Secret
Now that everything is running, you can share the proxy with your friends. The information they need is the server (your_domain), the port (443), and the secret.
Conclusion
You now have a camouflaged MTProto proxy server that you’ve tested with Telegram Messenger.
You can read more about MTProto at https://core.telegram.org/mtproto. You can read the Mtg documentation at https://github.com/9seconds/mtg.