Introduction
In this tutorial you’ll learn how to create your own V2Ray server on an Ubuntu 20.04 platform using the Mack-A script.
The server you build will implement the VLESS + WebSocket (WS) + TLS + Content Delivery Network (CDN) architecture. You’ll test your server with the Qv2ray graphical user interface (GUI) client.
At the end of this tutorial, you’ll have a working and tested V2Ray server.
Prerequisites
Before you begin this tutorial, you will need:
- Your own domain name, which may be free or paid.
- A virtual private server (VPS) running Ubuntu 20.04. You can rent servers from companies such as Vultr or Bandwagon Host. The documentation for the Mack-A script recommends that you start with a server that has a clean install of the operating system. If you have already used the server for other purposes, it is reommended that you reimage the server.
Step 1 — Adding Domain to Cloudflare
In the first step, you’ll add your domain to Cloudflare and create a DNS type A record pointing from the fully qualified domain name of your server to the server’s IP address.
Go to the Cloudflare site and follow the instructions to add your domain using a FREE plan:
- Sign up for an account, entering an email address and password.
- Enter the domain name you want to add to Cloudflare.
- Select the FREE plan.
- If an existing DNS
Arecord was not automatically retrieved, then manually add a DNSArecord pointing from the fully qualified domain name of your server to your server’s IP address. - In the Proxy status field, turn off proxying for now (in other words, just use Cloudflare’s DNS only services for now). The cloud icon beside your DNS
Arecord should be gray.

- Copy the details of the two Cloudflare nameservers assigned to you.
- Back at your domain name registrar, switch over your domain to use your two assigned Cloudflare nameservers.
- On the Cloudflare site, recheck your domain’s nameservers. Wait for the nameserver change to propagate. This can take anywhere from 1 hour to 24 hours.
- You should get an email when your site is active on Cloudflare.
Step 2 — Logging In as Root
SSH into your server. On Linux and macOS, you can use the terminal command ssh to reach your server. On Windows, you can either use PowerShell or a graphical user interface (GUI) such as PuTTY or XSHELL.
The documentation for the Mack-A script indicates that the script only supports running as root.
If you’re not logged in as root, then become root as follows. If you don’t already know the root password, then set it by issuing the command:
sudo passwd root
The sudo command allows non-root users to issue root commands. The passwd command allows you to set the password for yourself or another user, which in this case is the user named root.
You are prompted to enter your own password:
[sudo] password for amy:
Enter your own (non-root) password.
You are then prompted to enter a new password for the user root:
New password:
Choose and enter the new password for root.
You are prompted to confirm the new password by retyping it:
Retype new password:
Enter the same new password for root.
If all is well, you will receive a feedback message:
passwd: password updated successfully
Now you know the root password, become root:
su -
The su command (short for switch user) allows you to switch to another user id, so that you can run commands with that user’s privileges. Since no specific user is named, you will by default switch to the user root. The hyphen (-) means create a new login environment for the new user, which will be completely separate from your existing login environment.
You are prompted to enter the password for root that you set a few moments ago:
Password:
Enter the root password.
You will notice that your command prompt changes from a dollar sign to a hash sign:
#
This is a reminder that your are logged in as root. Now that you are root, you do not need to prefix privileged commands with sudo.
Update your package lists, and upgrade all your packages to the latest version:
apt update && apt upgrade -y
You will see package upgrade messages in your terminal.
Step 3 — Enabling the Firewall (Optional)
We recommend that you protect your server and especially port 22 (the SSH port) by installing a firewall. In this tutorial, you’ll install and configure the uncomplicated firewall (ufw).
On many Ubuntu systems, ufw is already installed. Check that ufw is installed on your system:
apt list ufw
You should see a message:
ufw/focal,now 0.36-6 all [installed]
If you do not see the message stating that ufw is already installed, then install the software package now:
apt install ufw
Now you’ll set up the firewall. If you can guarantee that you will always SSH into your server from a single IP address, then limit SSH access to just that single address. For example, if your IP address is 51.51.51.51, then issue the command:
ufw allow from 51.51.51.51/32 to any port 22 proto tcp
When you execute that command, you will see a message:
Rule added
If limiting access to a single IP address is not possible, but you can guarantee you will always connect from a known IP address range, then limit SSH access to just that range. For example, if you are in an office which always uses the IP address range 51.51.51.0/24, then issue the command:
ufw allow from 51.51.51.0/24 to any port 22 proto tcp
If limiting access to an IP address range is not possible, then you will have to open the SSH port for access from the entire world:
ufw allow ssh
In any case, we recommend that you further protect port 22 by using SSH key authentication in preference to password authentication. SSH key pair generation and upload to your server are out of scope for this tutorial. You can find tutorials on this subject on the web.
Open ports 80 (the HTTP port) and 443 (the HTTPS port). These will be used for V2Ray and for the Nginx camouflage website:
ufw allow http
ufw allow https
Enable UFW:
ufw enable
You will see a warning message:
Command may disrupt existing ssh connections. Proceed with operation (y|n)?
Type Y and press ENTER to confirm that you wish to enable ufw. You will see a message:
Firewall is active and enabled on system startup
Check the status of your firewall:
ufw status
You will see a firewall status display that looks like the following:
Status: active

To                         Action      From
--                         ------      ----
22/tcp                     ALLOW       51.51.51.0/24
80/tcp                     ALLOW       Anywhere
443/tcp                    ALLOW       Anywhere
80/tcp (v6)                ALLOW       Anywhere (v6)
443/tcp (v6)               ALLOW       Anywhere (v6)
If your VPS provider implements the concept of security groups, you will also need to open your security group assignments for ports 22, 80, and 443 in their control panel.
Step 4 — Downloading the Script
Change into the /root home directory:
cd ~
Download the script by running the following command:
wget --no-check-certificate "https://raw.githubusercontent.com/mack-a/v2ray-agent/master/install.sh"
You will see feedback messages as the download proceeds:
--2021-03-10 11:04:46--  https://raw.githubusercontent.com/mack-a/v2ray-agent/master/install.sh
Resolving raw.githubusercontent.com (raw.githubusercontent.com)... 185.199.108.133, 185.199.109.133, 185.199.110.133, ...
Connecting to raw.githubusercontent.com (raw.githubusercontent.com)|185.199.108.133|:443... connected.
HTTP request sent, awaiting response... 200 OK
Length: 109433 (107K) [text/plain]
Saving to: ‘install.sh’

install.sh          100%[===================>] 106.87K  --.-KB/s    in 0.02s

2021-03-10 11:04:47 (5.69 MB/s) - ‘install.sh’ saved [109433/109433]
After the download is complete, set the execution bit on the file install.sh to make the script executable:
chmod +x install.sh
Step 5 — Running the Script
Run the Mack-A install script:
./install.sh
You will see the main menu:
==============================================================
作者 Author:mack-a
当前版本 Current version:v2.3.30
Github:https://github.com/mack-a/v2ray-agent
描述 Description:七合一共存脚本 Seven-in-one combination script
==============================================================
1.安装 Installation
2.任意组合安装 Any combination of installation
-------------------------工具管理-----------------------------
3.账号管理 Account management
4.更换伪装站 Replace the camouflage site
5.更新证书 Update the certificate
6.更换CDN节点 Replace the CDN node
7.ipv6人机验证 IPv6 human-machine verification
8.流媒体工具 Streaming tools
-------------------------版本管理-----------------------------
9.core版本管理 Core version management
10.更新Trojan-Go Update
11.更新脚本 Update script
12.安装BBR、DD脚本 Install BBR, DD script
-------------------------脚本管理-----------------------------
13.查看日志 View log
14.卸载脚本 Uninstall script
==============================================================
快捷方式创建成功,可执行[vasma]重新打开脚本
The shortcut is created successfully, and the script can be
reopened by executing "vasma"
请选择 Please choose:
(As noted, if you ever want to run the script again in the future, just enter the command vasma.)
Type the option 1 for installation, and press ENTER.
You will see the options for core installation:
功能 Function 1/1 : 选择核心安装 Select core installation

==============================================================
1.Xray-core
2.v2ray-core
3.v2ray-core[XTLS]
==============================================================
Type the option 2 for V2Ray core, and press ENTER.
You will see the dependent tools being installed:
进度 Progress 2/17 : 安装工具 Install tools
 ---> 检查、安装更新【新机器会很慢,耐心等待】
 ---> 安装 Install unzip
 ---> 安装 Install socat
 ---> 安装 Install jq
 ---> 安装 Install binutils
 ---> 安装 Install qrencode
 ---> 安装 Install nginx
 ---> 安装 Install semanage
 ---> 安装 Install acme.sh
  % Total    % Received % Xferd  Average Speed   Time    Time     Time  Current
                                 Dload  Upload   Total   Spent    Left  Speed
100  204k  100  204k    0     0  1003k      0 --:--:-- --:--:-- --:--:-- 1003k
no crontab for root
no crontab for root
Then you are asked to enter your fully qualified domain name:
进度 Progress 3/17 : 初始化 Initialize Nginx 申请证书配置 app certificate config

请输入要配置的域名 例:www.v2ray-agent.com --->
域名:
Please enter the domain name to be configured
Example: www.v2ray-agent.com --->
Domain name:
Type the fully qualified domain name of your server, and press ENTER.
The script attempts to resolve the domain name to your server’s IP address. It asks you if it has correctly resolved the domain name:
 ---> 配置 Configure Nginx

检查IP是否设置为当前VPS
Checking if the IP is set to the current VPS
 ---> 检查ipv4中 Check IPv4

当前域名的IP为 [12.12.12.12],是否正确[y/n]?
The IP of the current domain name is [12.12.12.12],
is it correct [y/n]?
Assuming the IP address is correct, type y and press ENTER.
The script attempts to obtain a TLS certificate for this domain:
 ---> IP确认完成 confirmation completed

检查 Check Nginx是否正常访问 is normally accessed

 ---> Nginx配置成功 configuration is successfull

进度 Progress 4/17 : 申请TLS证书 Apply for TLS certificate

 ---> 安装 Install TLS 证书 certificate
 ---> TLS 生成成功 generated successfully

进度 Progress 5/17 : 配置 Configure Nginx
You are asked to choose a secret path name for V2Ray access:
进度 Progress 6/17 : 生成随机路径 Generate random path
请输入自定义路径[例: alone],不需要斜杠,[回车]随机路径
Please enter a custom path [example: alone], no slash is required,
[Enter] random path
Type a secret path name and press ENTER. We will use as our example here:
abcd1234
The script confirms this path and displays more progress messages:
path:abcd1234

----------------------------

进度 Progress 7/17 : 安装 Install V2Ray
 ---> v2ray-core 版本 version:v4.35.1
v2ray-linux-64.zip                         100%[========================================================================================>]  11.26M  10.3MB/s    in 1.1s

进度 Progress 8/17 : 配置 Configure V2Ray 开机自启 to start automatically after booting
Created symlink /etc/systemd/system/multi-user.target.wants/v2ray.service → /etc/systemd/system/v2ray.service.
 ---> 配置V2Ray开机自启成功 successfull

进度 Progress 9/17 : 安装 Install Trojan-Go
 ---> Trojan-Go版本:v0.8.2
trojan-go-linux-amd64.zip                  100%[========================================================================================>]   6.41M  5.72MB/s    in 1.1s

进度 Progress 10/17 : 配置 Configure Trojan 开机自启 to start automatically after booting
Created symlink /etc/systemd/system/multi-user.target.wants/trojan-go.service → /etc/systemd/system/trojan-go.service.
 ---> 配置Trojan开机自启成功 successfull
You are asked if you want smart DNS resolution:
进度 Progress 11/17 : 添加 Add DNS 智能解析 intelligent resolution

 移动 Mobile: 104.19.45.117
 联通 Unicom: www.cloudflare.com
 电信 Telecom: www.digitalocean.com
----------------------------
是否使用 Use or not?[y/n]:
Type the option y for yes, and press ENTER.
进度 Progress 12/17 : 初始化V2Ray配置 Initialize V2Ray config

进度 Progress 13/17 : 初始化Trojan配置 Initialize Trojan config

进度 Progress 14/17 : 添加定时维护证书 Add timed maintenance certificate
 ---> 添加定时维护证书成功 succeeded

进度 Progress 15/17 : 添加伪装站点 Add camouflage site
 ---> 添加伪装站点成功 Add camouflage site successfull
 ---> V2Ray关闭成功 V2Ray stop successfull
 ---> V2Ray启动成功 V2Ray start successfull
 ---> Trojan-Go关闭成功 Trojan-Go stop successfull
 ---> Trojan-Go启动成功 Trojan-Go start successfull

进度 Progress 16/17 : 验证服务启动状态 Verify service startup status
 ---> 服务启动成功 Service started successfully

进度 Progress 17/17 : 账号 Account number
The account configuration details are now displayed for various architectures:
VLESS TCP TLS/XTLS-direct/XTLS-splice通用格式(VLESS+TCP+TLS)格式化明文(VLESS+TCP+TLS/xtls-rprx-splice)二维码 VLESS(VLESS+TCP+TLS)
VLESS WS TLS CDN通用格式(VLESS+WS+TLS)格式化明文(VLESS+WS+TLS)二维码 VLESS(VLESS+TCP+TLS/XTLS)
VMess TCP TLS通用json(VMess+TCP+TLS)通用vmess(VMess+TCP+TLS)链接二维码 vmess(VMess+TCP+TLS)
VMess WS TLS CDN通用json(VMess+WS+TLS)通用vmess(VMess+WS+TLS)链接二维码 vmess(VMess+WS+TLS)
Trojan TLSTrojan(TLS)二维码 Trojan(TLS)
Trojan WS TLSTrojan-Go(WS+TLS) Shadowrocket二维码 Trojan-Go(WS+TLS) ShadowrocketTrojan-Go(WS+TLS) QV2ray
Step 6 — Copying Configuration Details
The account configuration details you want are in a section headed VLESS WS TLS CDN.
Look for the configuration preceded by:
---> 通用格式 Common format (VLESS+WS+TLS)
Here is an example:
vless://ae7dfdb9-31ba-d546-3bd0-9b4d3f6f0915@www.cloudflare.com:443?encryption=none&security=tls&type=ws&host=v2ray.your_domain.com&path=%2fabcd1234ws#v2ray.your_domain.com_vless_ws
Copy the account configuration details to a text editor. You will need them in a moment for your client.
Step 7 — Configuring Proxying on Cloudflare
Now go back to your Cloudflare account’s DNS tab.
In the Proxy status field, turn on proxying. The cloud icon beside your DNS A record should be orange.

Save this change.
Step 8 — Testing with Client
Before you go any further, test your camouflage site. In an ordinary browser, visit your fully qualified domain name on HTTPS (for example, https://v2ray.your_domain.com). You should see the camouflage site.
Now you know your camouflage site is working, you can carry on.
Download and install the most recent version of the Qv2ray client for Linux, Windows, or macOS from https://github.com/Qv2ray/Qv2ray/releases. For the rest of this section, we will give instructions for Windows.
Download the corresponding V2Ray core from https://github.com/v2fly/v2ray-core/releases (note that the GitHub account is now v2fly).
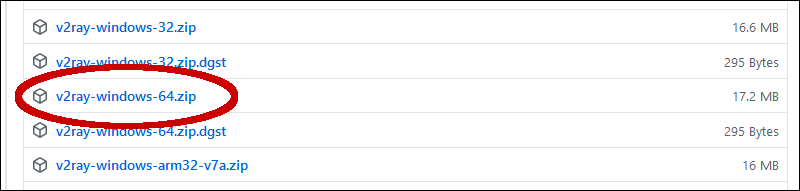
Unzip the downloaded zip file.
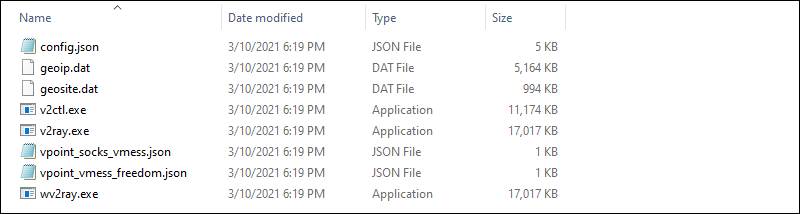
Create a folder to hold the core. On Windows it should be named C:\Users\your_user\AppData\Local\qv2ray\vcore.
Copy the files from the unzipped folder into place in the vcore folder.
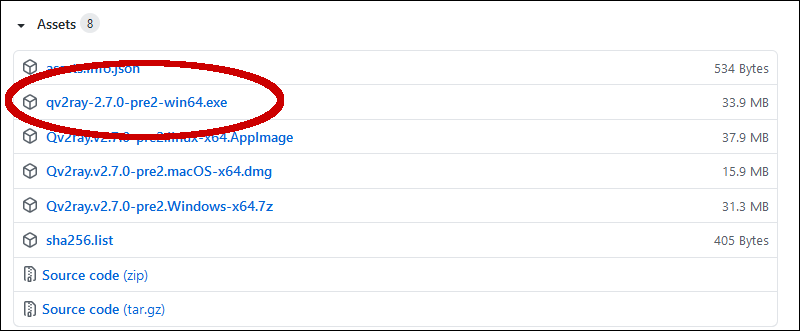
Run the Qv2ray installer by double-clicking on the executable, e.g. qv2ray-2.7.0-pre2-win64.exe. If Microsoft Defender SmartScreen appears, click More info then Run anyway. Run the installer, following the prompts.
When the installation is complete, you will see the Qv2ray shortcut icon on your desktop.
![]()
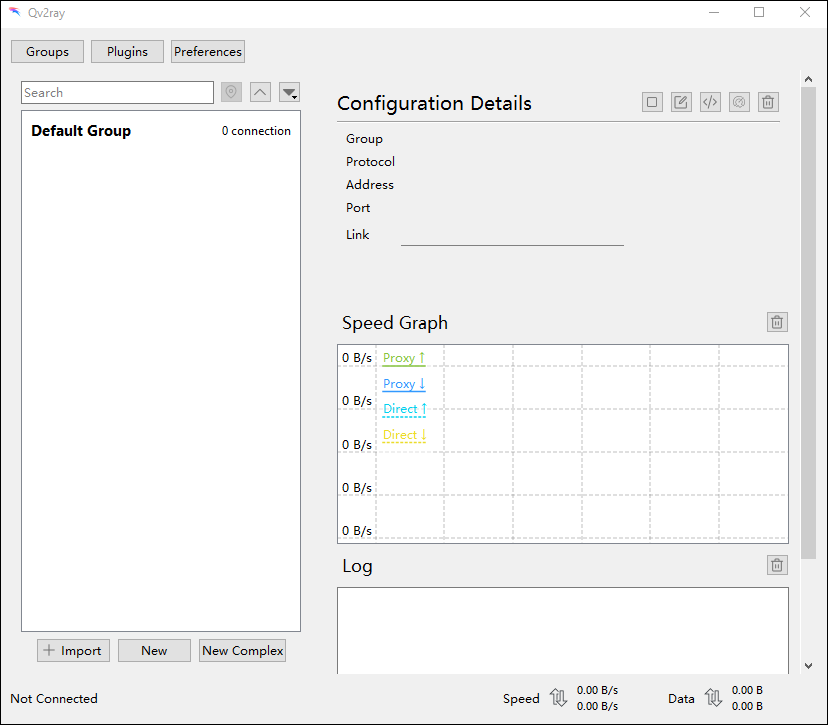
Double-click the icon to launch Qv2ray.
Press the Preferences button. On the Kernel Settings tab, specify your core executable path and assets directory. This is the folder you created named C:\Users\your_user\AppData\Local\qv2ray\vcore and the executable v2ray.exe.
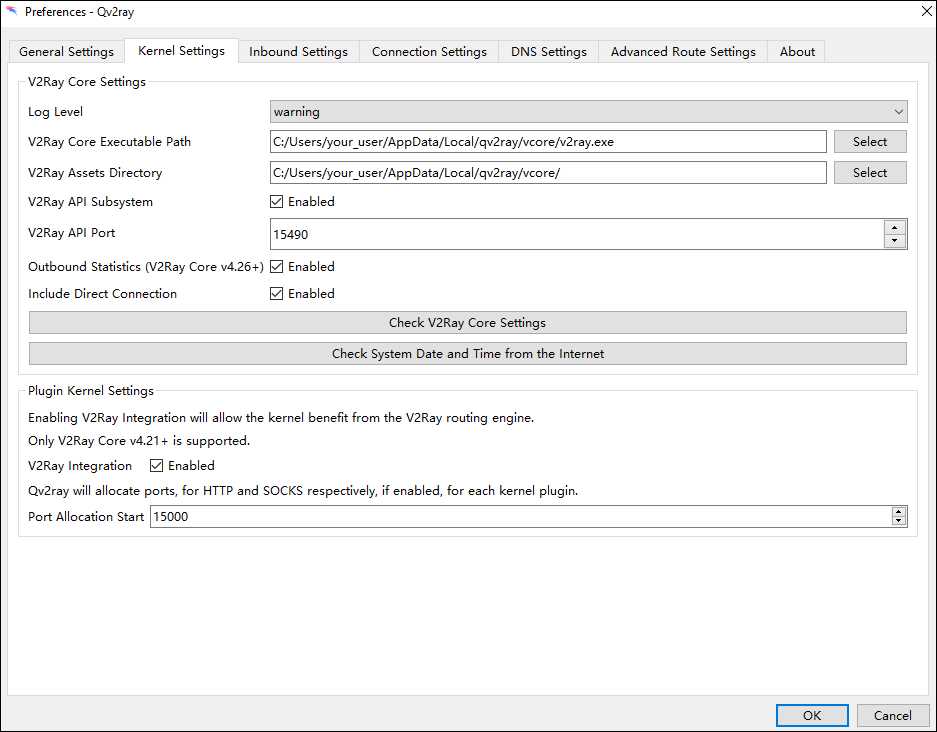
Click OK.
Now that the kernel settings are configured, you can add your server configuration to the Qv2ray client.
Copy the account configuration details (generated by the script and saved in your text editor) to your Windows clipboard.
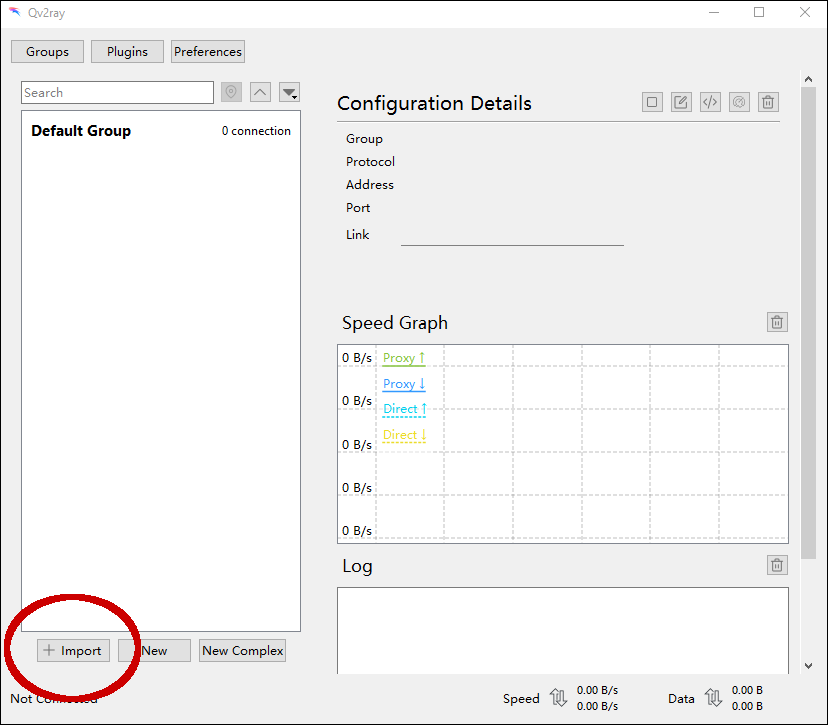
Press the Import button in Qv2ray to import the new configuration.
In the Share Link box, paste in the account configuration details from your Windows clipboard.
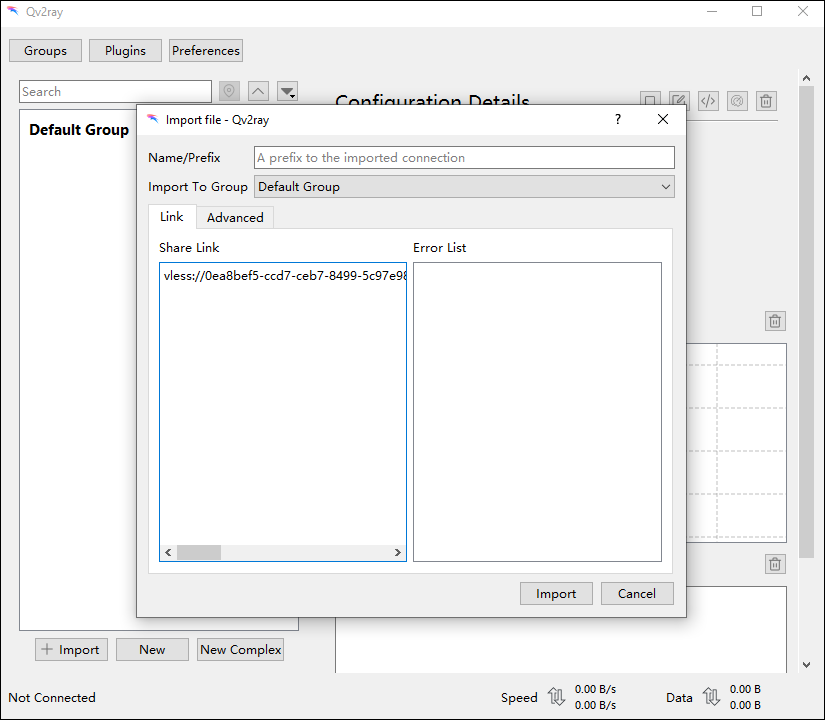
Click Import. The configuration details are imported from the link.
Double-click the Default Group to expand it, then select the server you have just added.
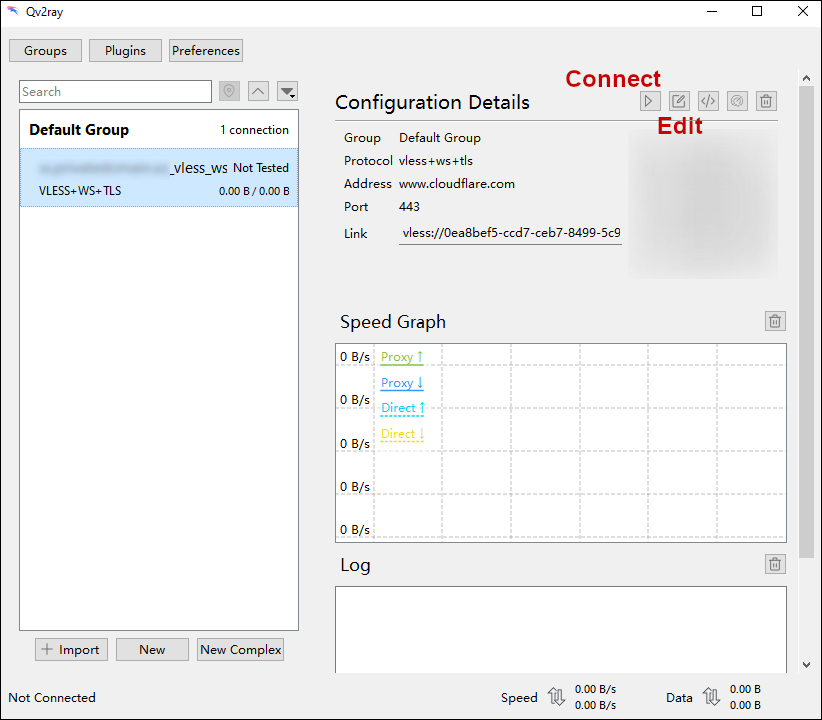
Press the Edit button for this server.
There is one setting you must add manually, which is the Server Address (SNI) on the TLS Settings tab. Type the fully qualified domain name of your server.
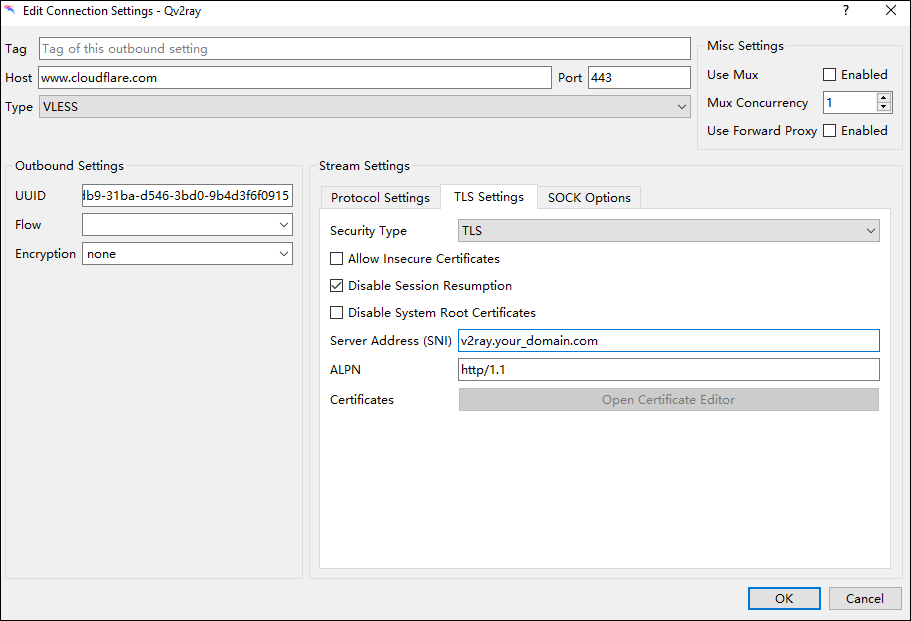
Click OK.
Click the Connect icon for this server. Notifications appear in Windows to say you are connected.

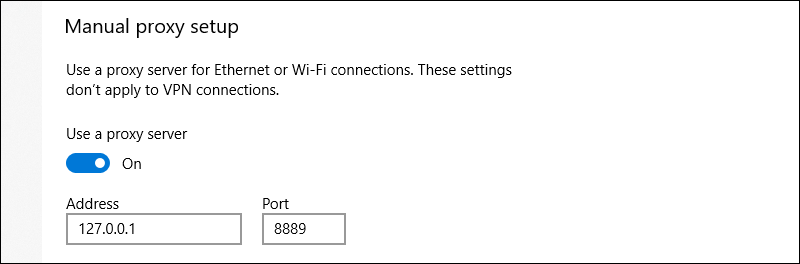
The system-wide proxy settings are automatically configured for you.

On Windows, by default your Qv2ray proxy server will listen on 127.0.0.1 port 8889. You can optionally check this in Settings > Network & Internet > Proxy > Manual proxy setup.
In your browser, visit https://www.iplocation.net to confirm that your web browsing is now coming from your server location.
When you have finished browsing, go back to your server in Qv2ray. (If you have closed the Qv2ray panel, you can open it again by clicking the Qv2ray icon in the system tray, which is at the bottom right of the Windows desktop.)
Select your server and click the Disconnect icon.
Conclusion
You now have a working VLESS + WS + TLS + CDN server that you’ve tested with the Qv2ray client.
You can find more documentation for the script on GitHub in English and 中文. The documentation includes suggestions for the best architectures, routes, and combinations.
See also
- How to Build a Shadowsocks-Rust Server with Docker on Ubuntu 20.04
- How to Create a Brook Server and Client on Ubuntu 20.04
- How to Install Tor Browser or Standalone Tor on Ubuntu 20.04
- How to Build a Camouflaged Telegram MTProto Proxy Server on Ubuntu 20.04
- How to Build a V2Ray Tor On-Ramp on Ubuntu 20.04