Introduction
Brook is a cross-platform proxy server and client that provides strong encryption and resistance to detection.
The design philosopy of Brook is to keep it simple. There are no complicated configuration files, and you can run Brook as a daemon without systemd.
In this tutorial you’ll see how to run a Brook server on Ubuntu 20.04 and how to test your server with a Brook client, also running on Ubuntu 20.04.
Prerequisites
Before you begin this tutorial, you will need:
- A virtual private server (VPS) running Ubuntu 20.04. You can rent servers from providers such as Google Cloud or Vultr.
- Your own domain name, which may be free or paid. In the rest of this tutorial, we use
domain.comas the sample domain name andfq.domain.comas the fully qualified domain name allocated to your server. - A DNS type
Arecord pointing from the fully qualified domain name of your server to the server’s IP address. Usually you set up the DNS record at your domain name registrar. You can also set up DNS records elsewhere, such as at Cloudflare. If you are using Cloudflare, note that some Xray configurations require DNS services only and will not work with proxying.
Step 1 — Logging In as Root
SSH into your server. On Linux and macOS, you can use the terminal command ssh to reach your server. If you run Windows on your workstation, you can either use PowerShell or a graphical user interface (GUI) such as PuTTY or XSHELL.
If you’re not logged in as root, then become root as follows. If you don’t already know the root password, then set the root password by issuing the command:
sudo passwd root
The sudo command allows non-root users to issue root commands. The passwd command allows you to set the password for yourself or another user, which in this case is the user named root.
You are prompted to enter your own password:
[sudo] password for amy:
Enter your own (non-root) password.
You are then prompted to enter a new password for the user root:
New password:
Choose and enter the new password for root.
You are prompted to confirm the new password by retyping it:
Retype new password:
Enter the same new password for root.
If all is well, you will receive a feedback message:
passwd: password updated successfully
Now you know the root password, become root:
su -
The su command (short for switch user) allows you to switch to another user id, so that you can run commands with that user’s privileges. Since no specific user is named, you will by default switch to the user root. The hyphen (-) means create a new login environment for the new user, which will be completely separate from your existing login environment.
You are prompted to enter the password for root that you set a few moments ago:
Password:
Enter the root password.
You will notice that your command prompt changes from a dollar sign to a hash sign:
#
This is a reminder that your are logged in as root. Now that you are root, you do not need to prefix privileged commands with sudo.
Update your package lists, and upgrade all your packages to the latest version:
apt update && apt upgrade -y
You will see package upgrade messages in your terminal.
Step 2 — Enabling the Firewall (Optional)
We recommend that you protect your server and especially port 22 (the SSH port) by installing a firewall. In this tutorial, you’ll install and configure the uncomplicated firewall (ufw).
On many Ubuntu systems, ufw is already installed. Check that ufw is installed on your system:
apt list ufw
You should see a message:
ufw/focal,now 0.36-6 all [installed]
If you do not see the message stating that ufw is already installed, then install the software package now:
apt install ufw
Now you’ll set up the firewall. If you can guarantee that you will always SSH into your server from a single IP address, then limit SSH access to just that single address. For example, if your IP address is 12.12.12.12, then issue the command:
ufw allow from 12.12.12.12/32 to any port 22 proto tcp
When you execute that command, you will see a message:
Rule added
If limiting access to a single IP address is not possible, but you can guarantee you will always connect from a known IP address range, then limit SSH access to just that range. For example, if you are in an office which always uses the IP address range 12.12.12.0/24, then issue the command:
ufw allow from 12.12.12.0/24 to any port 22 proto tcp
If limiting access to an IP address range is not possible, then you will have to open the SSH port for access from the entire world:
ufw allow ssh
In any case, we recommend that you further protect port 22 by using SSH key authentication in preference to password authentication. SSH key pair generation and upload to your server are out of scope for this tutorial. You can find tutorials on this subject on the web.
Open ports 80 (the HTTP port) and 443 (the HTTPS port). These will be used for Xray and for the Nginx camouflage website:
ufw allow http
ufw allow https
Enable UFW:
ufw enable
You will see a warning message:
Command may disrupt existing ssh connections. Proceed with operation (y|n)?
Type Y and press ENTER to confirm that you wish to enable ufw. You will see a message:
Firewall is active and enabled on system startup
Check the status of your firewall:
ufw status
You will see a firewall status display that looks like the following:
Status: active

To                         Action      From
--                         ------      ----
22/tcp                     ALLOW       12.12.12.0/24
80/tcp                     ALLOW       Anywhere
443/tcp                    ALLOW       Anywhere
80/tcp (v6)                ALLOW       Anywhere (v6)
443/tcp (v6)               ALLOW       Anywhere (v6)
If your VPS provider implements the concept of security groups, you will also need to open your security group assignments for ports 22, 80, and 443 in their control panel.
Step 3 — Generating a Strong Password
You need to generate a strong password to protect your server. Copy and paste the following command into your terminal session with your server:
< /dev/urandom tr -dc A-Za-z0-9 | head -c 16; echo;
The special file /dev/urandom on Linux systems provides an interface to the kernel’s pseudorandom number generator.
The contents of /dev/urandom become input to tr. The tr command is a command-line utility for translating or deleting characters. -d means delete and -c means complement, so -dc means delete any characters that are not in the set A through Z, a through z, and 0 through 9.
The output, now alphanumeric only, is piped into head. The head command is a command-line utility for outputting the first part of a file given to it via standard input. The -c switch limits the number of characters. The operand 16 is the number of characters you want.
Finally, the echo command echoes back input to the terminal, which in this case just gives you a new line after the display of your password.
Here is the sample output. You will see this example used in the rest of this tutorial:
RRO7JteDFPYa8e5v
In your terminal emulator, copy your generated password. Open a text editor such as gedit on your PC . Paste the password into your text editor.
You will need this password on both your server and your client when you run Brook on them.
Step 4 — Downloading Brook to Your Server
Still on your PC, open a browser. Visit the page https://github.com/txthinking/brook/releases. Determine the location of the latest release of Brook for 64-bit Linux. We will use as an example https://github.com/txthinking/brook/releases/download/v20210214/brook_linux_amd64.
In your terminal session with your server, download the binary for latest release of Brook. Using our file location example, your command would be:
curl -L https://github.com/txthinking/brook/releases/download/v20210214/brook_linux_amd64 -o /usr/bin/brook
curl gets the file. -L allows for location switching. The -o switch directs the output of curl to the /usr/bin directory, which should be in your execution path.
You will see feeback on the download size and speed. For example:
  % Total    % Received % Xferd  Average Speed   Time    Time     Time  Current
                                 Dload  Upload   Total   Spent    Left  Speed
100   623    0   623    0     0   3331      0 --:--:-- --:--:-- --:--:--  3331
100 10.8M  100 10.8M    0     0  20.3M      0 --:--:-- --:--:-- --:--:-- 20.3M
Make the binary executable:
chmod +x /usr/bin/brook
Step 5 — Running Brook on Your Server
In the examples in this tutorial, we are using Brook in WebSocket Secure (WSS) mode. WebSocket works over HTTP ports 443 and 80 and supports HTTP proxies and intermediaries, so it is fully compatible with the HTTP protocol. To achieve compatibility, the WebSocket protocol uses the HTTP Upgrade header to change from the HTTP protocol to the WebSocket protocol.
Before you go any further, ensure your prerequisites are complete. Make sure your fully qualified domain name can be successfully resolved, and ports 80 and 443 on your server are open.
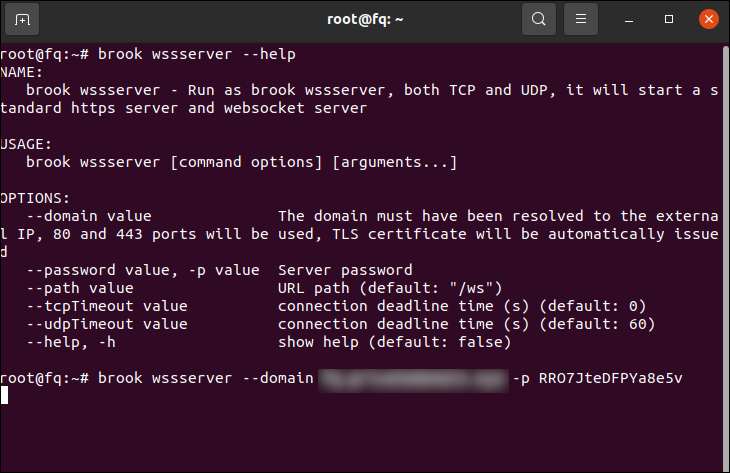
Then issue the following command, replacing fq.domain.com by the fully qualified domain name of your server, and replacing RRO7JteDFPYa8e5v by your generated strong password:
brook wssserver --domain fq.domain.com -p RRO7JteDFPYa8e5v
Wait for Brook to start. Brook will automatically request an SSL certificate for you. It listens on port 443.
There is no message on the terminal.
Leave the terminal open, with Brook running on the command line.
Step 6 — Downloading Brook on Your Client
Now go back to working on your PC. The first step, downloading the client, is similar to the equivalent step on the server.
Open a browser. Visit the page https://github.com/txthinking/brook/releases. Determine the latest release of Brook for 64-bit Linux.
Download the executable. By default your browser will put it into your ~/Downloads directory. It will have a name like brook_linux_amd64.
Open a second terminal session on your client (i.e, leave Brook running on the server in the first terminal session).
Copy the download into your /usr/bin directory, which should be in your execution path:
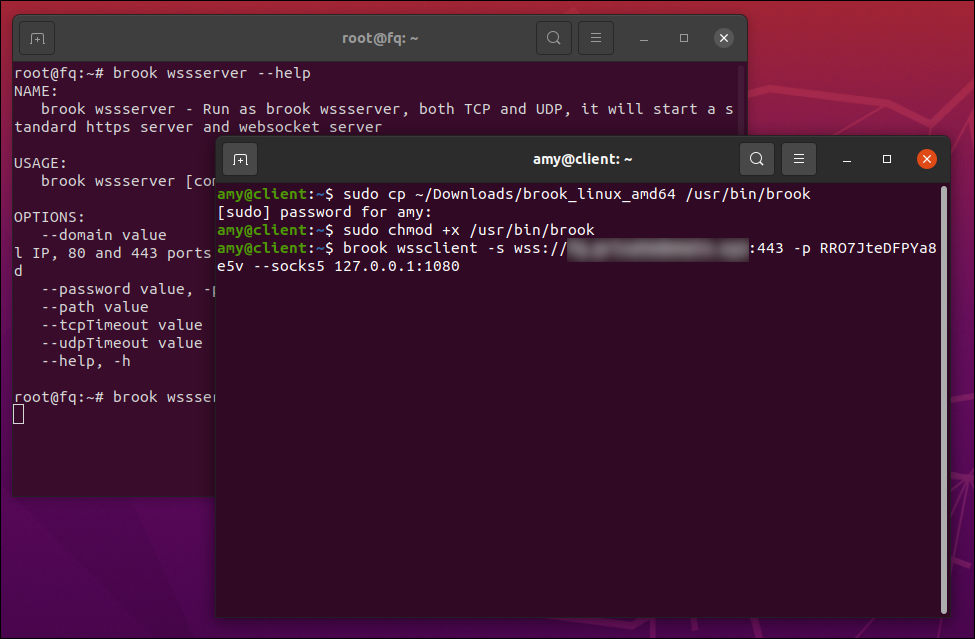
sudo cp ~/Downloads/brook_linux_amd64 /usr/bin/brook
We prefix the cp (copy) command by sudo because we assume you are running as a non-root user on your client PC.
Make the binary executable:
sudo chmod +x /usr/bin/brook
Step 7 — Running Brook on Your Client
Still in a teminal on your client, issue the following command. Replace fq.domain.com by the fully qualified domain name of your server, and replace RRO7JteDFPYa8e5v by your choice of strong password:
brook wssclient -s wss://fq.domain.com:443 -p RRO7JteDFPYa8e5v --socks5 127.0.0.1:1080
Also leave the second terminal window open, with the Brook client running in it.
The Brook WSS client is now listening on 127.0.0.1 port 1080.
Step 8 — Configuring Firefox to Use Brook
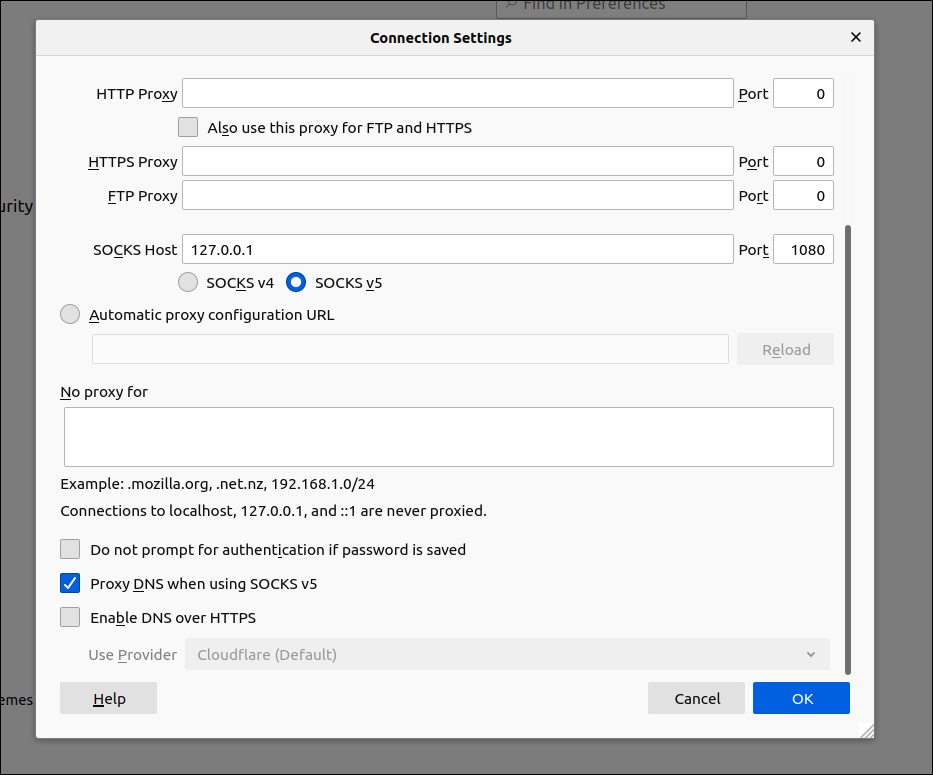
Open Firefox. From the hamburger menu, select Preferences. In the Network Settings section, click Settings. Set the network settings as follows:
- Select the radio button for Manual proxy configuration
- Fill in
127.0.0.1in SOCKS Host - Fill in
1080in the Port - Select the radio button for SOCKS v5
- Check the box Proxy DNS when using SOCKS v5
- Click OK
Firefox now sends requests to the Brook client, which in turn transmits them to the Brook server.
Do an end-to end test by visiting a site such as https://ipchicken.com. If everything is working properly, you will see the IP address of your server, not your client PC.

Step 9 — (Optional) Running Brook on Your Server as a Daemon
This tutorial follows the recommended setup order of running the Brook command directly first, to make sure there are no errors, before running it with joker. As a final step, you can optionally run Brook under joker.
Go back to your first terminal session, the one where you are SSH-ing into your server.
On the server, stop Brook running by pressing CTRL+C on your computer keyboard.
You will see a message such as:
^C2021/02/26 16:21:49 http: Server closed
Now download and install nami. nami is a decentralized binary package manager.
curl -L https://git.io/getnami | bash && sleep 6 && exec -l $SHELL
As before, curl is the command-line utility for transferring data to or from a server. In this case, the script location is https://git.io/getnami. The -L switch allows for possible changes of location.
The downloaded script is piped into bash, the Bourne Again SHell. We then allow a 6-second pause for the script to run. The exec command executes the script, with -l used to pass dash as the zeroth argument of the command. $SHELL means the user’s shell, as specified by the password database.
You will see feedback messages that look like this:
  % Total    % Received % Xferd  Average Speed   Time    Time     Time  Current
                                 Dload  Upload   Total   Spent    Left  Speed
  0     0    0     0    0     0      0      0 --:--:-- --:--:-- --:--:--     0
100  1478  100  1478    0     0   4752      0 --:--:-- --:--:-- --:--:--  4752
  % Total    % Received % Xferd  Average Speed   Time    Time     Time  Current
                                 Dload  Upload   Total   Spent    Left  Speed
100   624  100   624    0     0   3851      0 --:--:-- --:--:-- --:--:--  3875
100 11.5M  100 11.5M    0     0  12.9M      0 --:--:-- --:--:-- --:--:-- 44.0M
+-------------------+----------------------------+
| Package           | github.com/txthinking/nami |
|                   |                            |
| Installed Version | v20201101                  |
| Installed Files   | nami                       |
+-------------------+----------------------------+
nami is installed into your user’s .nami/bin directory, and .nami/bin is added to your execution path.
Use nami to download and run joker. joker is a simple, small, clean, zero-configuration tool for turning processes into daemons. Joker does not depend on systemd.
nami install github.com/txthinking/joker
You will see feedback messages that look like this:
+-------------------+-----------------------------+
| Package           | github.com/txthinking/joker |
|                   |                             |
| Installed Version | v20200902                   |
| Installed Files   | joker                       |
+-------------------+-----------------------------+
Now on you server you can run Brook under joker. Issue the following command, replacing fq.domain.com by the fully qualified domain name of your server, and replacing RRO7JteDFPYa8e5v by your choice of strong password:
joker brook wssserver --domain fq.domain.com -p RRO7JteDFPYa8e5v
You are returned to the root prompt (#).
At this stage you can exit your SSH session with the server.
exit
If you switched user, you will need to issue the exit command again.
Brook will still be runnning on your client. Do CTRL+C on your computer keyboard to stop the old Brook run on your client. Then start it again, replacing fq.domain.com in the command below by the fully qualified domain name of your server, and replacing RRO7JteDFPYa8e5v by your choice of strong password:
brook wssclient -s wss://fq.domain.com:443 -p RRO7JteDFPYa8e5v --socks5 127.0.0.1:1080
Firefox should still be configured to use Brook as its proxy server. Retest your entire setup by visiting a site such as https://ipchicken.com.
If everything is still working properly, you will see the IP address of your server.
When you have finished:
- Do CTRL+C in your client terminal to stop the Brook WSS client
- Set Firefox Network Settings back to using system proxy settings (i.e., none)
- Note that Brook continues to run under
jokeron your server for next time
Conclusion
You now have a working Brook server that you’ve tested with the Brook client.
You can read the documentation for Brook at https://txthinking.github.io/brook.
See also
- How to Build a Shadowsocks-Rust Server with Docker on Ubuntu 20.04
- How to Create a VLESS WebSocket TLS CDN Server on Ubuntu 20.04
- How to Install Tor Browser or Standalone Tor on Ubuntu 20.04
- How to Build a Camouflaged Telegram MTProto Proxy Server on Ubuntu 20.04
- How to Build a V2Ray Tor On-Ramp on Ubuntu 20.04